Monday 27 February 2017

How to reset Windows 10

Hi folks many of the time we face problems with the operating systems. Earlier we used to format the system whenever something goes wrong. Refresh/Reset option have introduced by Microsoft with windows 8. Though it was really easy to reset/refresh in windows 8 as we would be able to go to it by typing 
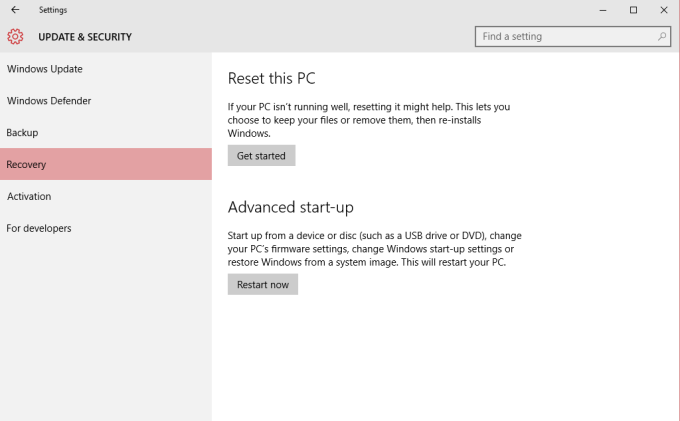
into search command. In windows 10 it is gone in troubleshooting options at startup screen and can also be found in the Setting>Update & Security>Recovery>Reset the PC.
reset-windows-10


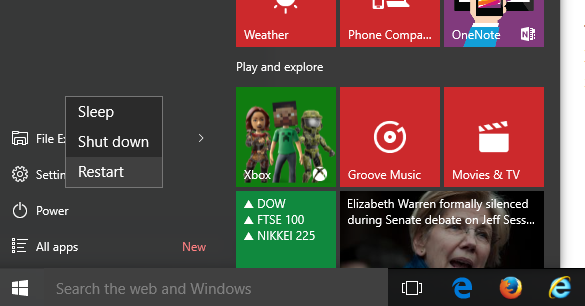
The other method is to boot into troubleshooting mode. Go to Start button, find Power>when you see power options>press Shift button on your keyboard and click on to restart. Next your computer will be 
restarted and give you various options to troubleshoot.

reset-windows-10-2

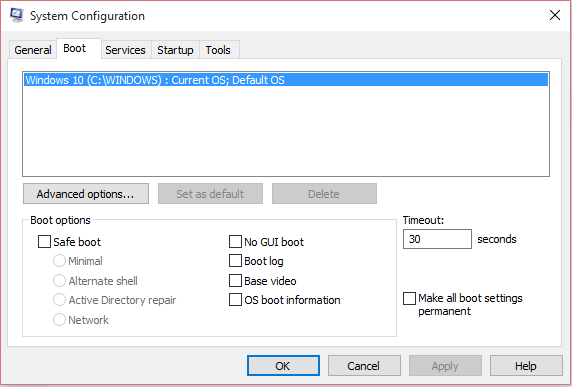
In the 2nd option you can also set your system to boot from safe mode.

Note: You need to have iso image of the OS in order to refresh/reset the system.

Windows Server 2012 R2 Automative Activation Keys

Windows Server 2012 R2 Automotive Activation Keys (VM only)
In windows server 2012 a new feature i.e. AVMA introduced. It activates Windows Server 2012 R2, provided the Hyper-V host they're running on is Windows Server 2012 R2 Datacentre and is itself activated. Below are the keys that you need to give to the VMs

Server Standard : DBGBW-NPF86-BJVTX-K3WKJ-MTB6V
Server Datacentre : Y4TGP-NPTV9-HTC2H-7MGQ3-DV4TW
Server Essentials : K2XGM-NMBT3-2R6Q8-WF2FK-P36R2

How to take regular backup the files (automatically)

How to Backup your files automatic

Robocopy is a Windows command-line utility which is used to backup the files. It also helps to generate detailed report of the backup operation.It works with the .bat file which is created through notepad. Read the steps below.

Open a blank notepad
type Robocopy
copy the source folder path
Space
copy destination folder path
Space
Type /E in the end of line
Enter
Type Pause

It will look like

robocopy D:\backup Z:\27022017 /E
Pause 


Pause defines that the command prompt should remain open after completion of the backup task. It shows the Summary in the command line window when done.

Next Save it by any of your favorite name with .bat format extension. Now run this bat file as administrator and your file backup is started. After it finishes copy, detailed report is shown.

After /E you can put /XD to exclude the files or folders. Suppose I want to copy whole backup folder but don't want to copy a folder named as 'Old' lying inside it. 


robocopy D:\backup Z:\27022017 /E /XD "Old"

If you want to add more exclusions give a space and add another name. To Automate Read my next post "Run program automatically"


How to solve 'Limited Network' Error

Run the following command with 'Command Prompt' as administrator

netsh int tcp set heuristics disabled
 netsh int tcp set global autotuninglevel=disable
 netsh int tcp set global rss=enabled
netsh int tcp show global

Restart the machine (necessary)

Extend Azure VM C drive

Extend size of Azure Virtual Machine C drive.
Before going through this post, determine the exact requirement of the size. Once you extend the size there no reduce option available. Also remember that extending SSD drive would influence on your billing.

Login-AzureRmAccount
Select-AzureRmSubscription -SubscriptionName 'my-subscription-name'
$rgName = 'my-resource-group-name'
$vmName = 'my-vm-name'
$vm = Get-AzureRmVM -ResourceGroupName $rgName -Name $vmName
Stop-AzureRmVM -ResourceGroupName $rgName -Name $vmName
$vm.StorageProfile.OSDisk.DiskSizeGB = 500
Update-AzureRmVM -ResourceGroupName $rgName -VM $vm
Start-AzureRmVM -ResourceGroupName $rgName -Name $vmName
Go to the computer management and Extend the C Drive Size.

SQL Account 'sa' Disabled

Of many reasons if sa account is disabled try following Query to check and enable it.
Run the query below on Master

sa-account-disabled

You might want to enable it through right clicking on sa user > properties > status > Enabled

sa-account-disabled2

Disable IP AutoConfiguration

Before doing this try to restart dhcp client service.Create a key..  Name as IPAutoconfigurationEnabled Please considering backup of registry before making the changes to it.

Computer\HKEY_LOCAL_MACHINE\SYSTEM\CurrentControlSet\Services\Tcpip\Parameters

ip-autoconfiguration

How to Speed-up your computer

How to improve performance of your computer
Some basic things that we can perform on our windows OS to increase the performance of the of PC. This is nothing but to disable the programs that are not require. If the system has the serious performance issue, you should try to boot up in safe mode (Read my post 'Boot in safe mode'). If it results good we can go further with the decreasing unwanted services and disabling startup programs that are not require. 

1. Decrease the unnecessary-Services
Press Windows+R for run and Type msconfig in run hit enter.

msconfig2

System Configuration Window will appear as below. Go to Services Tab

stop-unnecessary-services
Check on hide all Microsoft Services which we should not stop. Disable the rest one by one or Disable them all. After making changes we need to restart System.
   
2. Disable Startup Services
Right Click on taskbar (the bar that appears on bottom of your screen) and click on Task Manager.

speedupsystem

Go to the Start-up tab, where you will see all the programs that starts with the system startup. Select the program that you think is not really useful to you and disable it. Close the task manager and restart you system again.

PC can also be slow because of the animation used by Windows. You can disable animations following the steps.
Go to System by right clicking Start button ( very left corner of the taskbar) Or right click on 'This PC' or on 'My Computer'. New System Window will open where you will find 'Advance system settings'
minimize-animation

In the System Properties>Advanced Tab>Performance>Setting. Performance option will pop up. Select 'Adjust for best performance', click apply and OK.

Following these steps PC will perform faster than earlier.

Boot in Safe Mode

How to Boot you PC in Safe-mode
There are incidents when you can't operate your system properly. It will give performance issue, some drivers are not compatible and unknown malwares/plugins trying to hang the system. We have to check by booting the machine into safe mode. Safe mode basically used to boot the system with minimal programs to troubleshooting Certain Issues or Backup important data before formatting the Computer OS.

There are two Method to boot into safe mode going into troubleshooting mode (for windows 10) mention in 'How to reset Windows 10' blog. For other windows OS start continuous hitting F8 key on keyboard at Start-up screen. The other method is checking Boot option in System configuration Window. Given below is the method we can follow.

Press key combination Windows+R and type in run as 'msconfig'

msconfig2

After the System Configuration Window open up, go to Boot Tab

msconfig

Under Boot tab boot options are available.
Check to the Safe boot with minimal and click on 'Apply' Button and press 'ok' Restart the system and it will start up in safe mode.
You can now just uninstall the program that you think causing the problem.


Reset lost farm passphrase SharePoint 2013

When administrating SharePoint server there would be many situations where we accidentally get disconnected with the SharePoint server farm. Finding the solution on how to get connected back to the lost SharePoint sites, we open the SharePoint product Configuration wizard and start to connect back to the existing farm. Very next we remember that we do not have the SharePoint farm passphrase.

The option of resetting passphrase will only work when you are connected to the farm. It is done through Sharepoint powershell commands

Get-Help Set-SPPassPhrase -Detailed
$Passphrase=ConvertTo-SecureString -String "1qaz2wsxE" -asPlainText -Force
Set-SPPassPhrase -PassPhrase $Passphrase -confirm
Confirm the Passphrase

But assuming that we already got disconnected without the passphrase being stored. There are still hopes as long as the wss_content database of the earlier site is available in the sql server. want to know how? follow the steps below.

Open up SharePoint product Configuration wizard
Click yes on Reset services>Next
Connect to Server Farm
Specify database setting and create new database name except the earlier i.e.'Sharepoint_config'
Review the setting and Click Next
It will take approx 10 minutes time to configure new farm setting.

Login to the Central Administration with Administrator Login details.

Go to Application Management>Manage Applications
Create new application and put the details as per your requirement. On the same page there is a  database setting where you will have to mention the name of your original database. It normally is 'wss_content' or 'wss_content_xxxxxx'. A Pop up of Completing successfully will give the new web application listed. This is the same site that you have lost.


How to start a program with Windows start up

Ever you thought of starting a program with the system startup? In windows there is a folder where we can add the shortcut of a particular program that we want to start with the system.This can be helpful when you are working and have to start a program everyday when you start the system. It saves the time to open the application manually. Enough with intro? Let’s see how to do it!
Right click on the start button of your machine or press Win+R key combination to open the run window. Type %AppData% hit enter


startupprogram1

This will take you to the Roaming folder of AppData. From there you will need to go to the below location.

startupprogram2

This is the place where your program shortcut will be pasted. All the application shortcuts that are seen here going to start with windows start up. Let’s see how to start a program. Type into search bar the name of a program, right click on it and find the location.

startupprogram4

PSR shortcut of Step Recorder is an example of a program here. When you click on Open file Location, a shortcut of the program location will open. (Sometime there will be exe file of a program, in such case we have to create a shortcut such as - Righ click onto exe and "Send to>Desktop(Create Shortcut)"). Next Copy the shortcut and past it into below location as depicted in the image above.

C:\Users\******\AppData\Roaming\Microsoft\Windows\Start Menu\Programs\Startup

Saturday 25 February 2017

Stateful Vs Stateless Firewall

Stateless Firewall watch network traffic and block it based on source and destination addresses or static values.
When a stateful Firewall allows an outgoing connection it knows that it has to allow the return connection for the same session. There is no need to create an access rule. Only one outbound connection rule is enough.
Whereas stateless firewall needs two different rule one for outbound connection and one for return connection for the same session. They are basically ACLs and contain rules about which traffic to allow/block depending on Source IP, Destination IP, Port numbers, Protocols etc. But it can be vulnerable and different attack techniques might bypass them.

All modern firewalls come with stateful inspection by default. Its also called Stateful Packet Inspection.


NAT and it's Types

NAT stands for Network address translation and is a method of remapping one ip address to another ip address. This is done to get the internal client connected to internet with private IP address. It is one of the those measures taken to save the IPv4 addresses wastage.
Static NAT
A table is created in the router where each internal IP is associated with external IP ( i.e. registered IP ). This is one Internal IP to another external IP mapping. This is used mainly to access a System from outside Network.

Dynamic NAT
A Nat Router maintains a list of Registered IP. When an internal client needs access to the internet, router maps its ip to one of the registered IP which is not in use.

NAPT
In this there is only one registered IP address in the table. Every time a client needs internet it is assigned a port no. with its ip address. For ex. a client's IP 192.168.0.4 is to be mapped with port 400. Here the internal address will be 192.168.0.0:400 and mapped to registered ip with same port. The response came from internet includes originating port and the router knows whom to forward the response